
Install a Tub to Shower Kit

It is easy to install a tub to shower kit! Each Step Through tub to shower conversion kit will include the Step Through part, a copy of these installation instructions, a cutting template, a slip resistant pad and an epoxy adhesive.
For a printable/pdf copy of the instructions for how to install a tub to shower kit, click here: Step Through Kit Instructions
Tools & Equipment
- Tape Measure
- 2 x 4s
- Recommended Adhesive
- Card Paper
- Caulking Gun
- Chisels
- Denatured Alcohol
- Drill and Drill Bits
- Drop Cloths
- Dust Mask
- Dust Pan and Brush
- Ear Protectors
- Extension Cord
- Safety Glasses
- Gloves
- Hammer
- Mirror
- Jig Saw with 2" Blades
- Masking Tape
- Paper Towels
- Pliers
- Deburring Tool
- Saws-all with Metal Blades
- Scissors
- Screw Driver
- Assorted Screws
- Side Grinder with 4" Diamond Blade
- Utility Knife
- Permanent Marker
- Vacuum
- White Silicone
- Items included in kit: Installation Instructions, Template, Adhesive, Slip Resistant Pad
Kit Contents
As soon as you receive your order, confirm you have received all parts included with the kit:
- Insert Piece
- CARDBOARD template
- Adhesive
- Slip Resistant Pad
- Instructions

Template
Occasionally, the template is mistaken for packing materials and thrown away. If you cannot find the template, you can make one from the shipping box.
As a single piece, cut off one side and bottom panel of the shipping box. The bottom panel will be the part that rests on the tub rail. Along the fold of the two panels, measure and draw the top dimensions (25″ or 25½″). From the center of this line, measure (8″ or 10″) down to mark your height. Then measure out 11.5″ to each side from this mark to draw the line for the bottom. Draw lines to connect your top and bottom lines. Cut the cardboard to complete the template.

How to Install a Tub to Shower Kit from the Step Through Store:
1: First, measure the rail to determine which insert to use. (Image A)
2: Before you begin, check the existing tub for chips, cracks or any other deformities. Inform the customer if there are any.
3: Mark the insert location by finding the center point of the tub and measuring back, half the distance of the insert itself. Then place the insert template over the tub. Trace on both sides using a permanent marker. Flip template over and trace on the inside of the tub. (Image B)
4: Cover the drain by either taping over open drains or closing the push and pull ones.
5: Then cut entry points on the top corners. (Image C)
Tip: On fiberglass or steel tubs, cut with a sawsall. While on cast iron tubs, use a side grinder with a diamond blade. Since cutting a cast iron tub is more difficult, you must use the side grinder with the attached shop vac. You also have to make several passes with the side grinder to completely cut through the tub.
How to Install a Tub to Shower Kit: Images A, B, C

6: Cut on the vertical lines that will connect to the bottom cuts.
Tip: A side grinder may come in handy for making a starter cut where the side and bottom cuts meet. You can come back and clean up the corners once the tub piece is removed.
7: Cut out the side and bottom markings on both sides of the tub. Leave the top markings for the last cut.
8: Cut the top two sides of the tub. (Image D)
9: Start by cutting at one of the top corners. Continue downward until you reach the bottom corner. Continue cutting out the panel along the bottom and other side.
Tip: A side grinder may come in handy to make starter cuts where the side and bottom cuts meet
10: Clean up any debris with the dust pan and broom and the vacuum.
11: Place a piece of cardboard onto the ends of the tub and start tracing the profile of the tub. Place the appropriate marking on the tracing so you know which side was traced. Repeat this step for the opposite side. (Image E)
12: Cut out the cardboard templates with scissors. Remember to cut both the left and right sides.
Tip: You should always be prepared with 2×4 studs, pieces of 1/2″ and ¾″ plywood and various thicknesses of scrap acrylic. Until you cut the tub out, you will not know how much scrap wood and acrylic you will need to support the bottom of the step through insert.
Tip: If your tub is CAST IRON – skip to step 18. Support blocks are not necessary for CAST IRON side walls, just the floor.
13: Cut support blocks out of 2 x 4 studs. Measure the width of the opening on the left and right sides. The wood blocks will help support the apron walls and provide a good area for the adhesive to settle. (Image F)
Images: D, E, F
14: Hold a 2 x 4 halfway up the opening and trace lines on both sides of the opening onto the 2 x 4 marking the width. Mark the 2 x 4 so you know if it is the left or right side. Do the same for the opposite side, then cut the wood according to the markings.
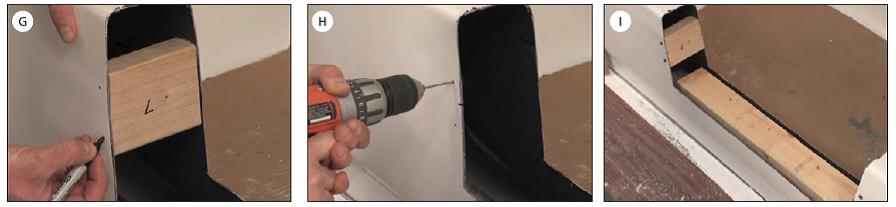
15: While holding the 2 x 4 in place halfway up the side of the cut out, place one dot with your marker on the bathtub about ¾″ from the top of the wood block and another dot about ¾″ from the bottom of the wood block. Do this on both the inside and outside of the apron on both sides. These dots will mark the location of screw placement that will hold the wood blocks in place. (Image G)
16: Then remove the blocks and drill 1/8″ holes in the bathtub where you placed the screw marks. (Image H)
17: Place the wood blocks back into place and drive a screw through the drilled holes into the wood block. You should have four screws per block.
18: Install the support for the bottom of the insert. Stack 2 x 4 stud blocks from the floor to the bottom of the walk-thru insert. (Image I)
Images: G, H, I
19: Make sure floor is dust-free. If there is a brace, you may need to cut the 2 x 4 into two pieces to avoid it.
20: For wood floors, screw the bottom piece into the floor. For other floors, place a good amount of adhesive onto the floor and place the 2 x 4 on top of the adhesive. Press firmly into place.
21: Apply adhesive on top of the 2 x 4 inside the tub. Place the next 2 x 4 on top of the already inserted 2 x 4 and press firmly into place. Continue this process until you have built the support up high enough to contact the bottom of the walk-thru insert and trace.
Tip: Because the inside plane of the bathtub is sloped, you must put the slanted part of the walk-thru insert on the inside of the tub.
22: Place your cut-out patterns on the respective sides of the walk-thru insert.
23: Place the pattern on the side of the walk-thru insert about 1-5/16″ above the bottom of the insert and trace. Repeat for other side using that side’s template. (Image J)
24: Using a straight edge, extend down your pattern side lines to the bottom edge in order to line up the respective traced patterns on each end of the insert. Then connect both side markings across the bottom. This will give you a straight line to follow when cutting the bottom. (Image K)
25: Make sure your jigsaw has a felt protector, and insert a short blade.
Tip: The length of the blade stroke when fully extended should not exceed 1½″ otherwise it will cut through the top side of the insert.
26: Start cutting along the traced lines. Once you have cut along the bottom and both sides, the cut section will come out as one piece. (Image L)
27: Use your deburring tool to clean up all of the edges and then test fit the insert over the cut out area of the bathtub. Stand on the insert with clean shoes. If it flexes or bows down with your weight, then you can either cut higher on the sides of the insert or add more wood to the support blocks.
Images: J, K, L

28: After proper fit is accomplished, take off the insert. Then add a liberal amount of adhesive to the wood blocks on each side and on top of the stack of wood resting on the floor.
29: Clean all the corners with denatured alcohol. Make sure the insert is fully compressed. Then cover the top of the insert with a paper towel and step on it. This prevents any shavings from damaging the surface of the insert.
30: Seal the entire insert from one end to the other. Place a good bead along the upper edges and proceed down the sides. Clean up your beads with a caulk finishing tool. Use a mirror to help apply adhesive to the bottom of the insert.
31: When using, apply the slip-resistant step pad,
32: Wipe down the step with denatured alcohol. Center the pad on the step and make a couple of small marks to indicate position. Use a tape measure to double check that items centered.
33: Peel off the backing from the pad and press into place, using your guide marks for position. Clean up any exposed marks using denatured alcohol.
34: Finally, vacuum any debris and clean up the area. Do not use insert for 24 hours from completion.
Step Through Kits and complementary bathroom safety products can be purchased through our online store.
Testimonials and reviews of the installation process from previous customers can be found via our Google Reviews.